How to Launch Your NFT Collection in Solana, Blazingly Fast
Deploy NFTs on Solana quickly using Metaplex tools. This step-by-step guide covers CLI setup, configuration, and deployment for launching your collection in minutes with verified templates.

TL;DR
To launch an NFT collection on Solana, use the Metaplex CLI and its Candy Machine, a fully on-chain generative NFT distribution program. On a fresh Ubuntu 20.04 box, install Node, the Solana CLI and Metaplex, create a wallet, write a config.json, prepare assets and metadata, then upload, verify, and mint tokens. The guide deploys to devnet, but the same steps apply to testnet and mainnet.
Completing the prerequisites
We are starting with a fresh install of Ubuntu, preferably Ubuntu 20.04. Let’s first make sure we have all the required dependencies installed.
All code snippets and commands in this tutorial are intended to be applied directly in the terminal. No editing is required.
sudo apt install git
curl -fsSL <https://deb.nodesource.com/setup_16.x> | sudo bash -
sudo apt-get install -y nodejs
sudo npm install -g yarn
sudo npm install -g typescript
sudo npm install -g ts-node
We are also going to need the Solana CLI, for which we will do the following:
sh -c "$(curl -sSfL <https://release.solana.com/stable/install>)"
source ~/.profile
We quickly verify that everything is installed by requesting the version of each component.
git version
node --version
yarn --version
ts-node --version
solana --version
These are the versions in my work context.
$ git version
git version 2.25.1
$ node --version
v16.13.2
$ yarn --version
1.22.17
$ ts-node --version
v10.4.0
$ solana --version
solana-cli 1.8.15 (src:430cdf67; feat:1061440932)
Everything we are going to do is based on the Metaplex repository. This repository contains two items that are essential for this deployment. The Metaplex CLI and a template for an NFT minting website.
git clone -b v1.1.1 https://github.com/metaplex-foundation/metaplex.git
yarn install --cwd ./metaplex/js/
Finally we verify the operation of the Metaplex CLI requesting the version.
ts-node ./metaplex/js/packages/cli/src/candy-machine-v2-cli.ts --version
In my case:
$ ts-node ./metaplex/js/packages/cli/src/candy-machine-v2-cli.ts --version
0.0.2
Creating a wallet and configuring the environment
We will do this deploy in devnet, but the same procedure is valid to be applied in testnet and mainnet. We create a new wallet omitting the recovery phrase (if you want to use a recovery phrase, you must remove the — no-bip39-passphrase parameter). This wallet will be stored in a json file. We set the default wallet by assigning the newly created wallet to it and finally we specify that our default network is the devnet.
solana-keygen new --force --no-bip39-passphrase --outfile ./.config/solana/devnet.json
solana config set --keypair ./.config/solana/devnet.json
solana config set --url https://api.devnet.solana.com
To be able to deploy we are going to need some SOL, so we request 2 SOLs through the airdrop command.
solana airdrop 2
solana balance
solana address
Configuring our deployment
Let’s continue with the configuration of our Candy Machine. But what is the Candy Machine? The Candy Machine is, quoting the authors’ own words:
a fully on-chain generative NFT distribution program
We are not going to generate alternative ways to deploy our NFTs, since all the work of the people linked to Solana and Metaplex is aimed at making the deployments through the on-chain programs written by them.
This on-chain program is generated through the Metaplex CLI, for which it is necessary to write a configuration file that will establish the program’s operating parameters. We are going to start with a simple template and we are going to modify some attributes based on the address of our wallet.
cat > ./config.json << EOL
{
    "price": 1.0,
    "number": 10,
    "gatekeeper": null,
    "solTreasuryAccount": "<YOUR WALLET ADDRESS>",
    "splTokenAccount": null,
    "splToken": null,
    "goLiveDate": "25 Dec 2021 00:00:00 GMT",
    "endSettings": null,
    "whitelistMintSettings": null,
    "hiddenSettings": null,
    "storage": "arweave-sol",
    "ipfsInfuraProjectId": null,
    "ipfsInfuraSecret": null,
    "awsS3Bucket": null,
    "noRetainAuthority": false,
    "noMutable": false
}
EOL
We modify the solTreasuryAccount using our wallet address (created in the previous steps). The following command replaces the string <YOUR WALLET ADDRESS> with your current wallet address.
sed -i "s/<YOUR WALLET ADDRESS>/$(solana address)/g" ./config.json
And finally we change the storage method of our assets to arweave. But, what is Arweave? Arweave is a protocol that allows you to store data in a decentralized network, with a single upfront fee. For the purposes of this tutorial we are going to use Arweave services, however the list of asset stores has other options, including AWS.
sed -i "s/arweave-sol/arweave/g" ./config.json
Generating the assets and metadata
Our deployment will consist of a very small collection of sample images, but it will serve perfectly to illustrate the procedure for larger deployments. We will take the sample assets provided by Metaplex and unzip them into a folder named assets.
curl https://docs.metaplex.com/assets/files/assets-
934a7281da49092b2a477733d067d8a0.zip --output ./assets.zip
unzip ./assets.zip
rm -f ./assets.zip
Each asset is accompanied by a json file that contains its metadata. The json structure is as follows:
{
    "name": "Number #0001",
    "symbol": "NB",
    "description": "Collection of 10 numbers on the blockchain...",
    "seller\_fee\_basis\_points": 500,
    "image": "0.png",
    "attributes": [
        {"trait\_type": "Layer-1", "value": "0"},
        {"trait\_type": "Layer-2", "value": "0"},
        {"trait\_type": "Layer-3", "value": "0"},
        {"trait\_type": "Layer-4", "value": "1"}
    ],
    "properties": {
        "creators": [{
            "address": "6j4nNrozTJkk1zatiXHezSLZArnRUq3WkGKHACThXGpZ",
            "share": 100}
        ],
        "files": [{"uri": "0.png", "type": "image/png"}]
    },
    "collection": {"name": "numbers", "family": "numbers"}
}
Pay special attention to the symbol attribute, without which I got errors during deployment that prevented it from completing successfully.
We are going to replace the creator address that the Metaplex assets bring with our own address.
for json\_file in ./assets/\*.json;
do
address=$(solana address)
sed -i "s/6j4nNrozTJkk1zatiXHezSLZArnRUq3WkGKHACThXGpZ/$address/g" $json\_file
done
Deploying!
Having configured our Candy Machine and our assets, we are ready to deploy. To do this we are going to use the CLI, passing it the necessary arguments.
ts-node ./metaplex/js/packages/cli/src/candy-machine-v2-cli.ts upload \
-e devnet \
-k ./.config/solana/devnet.json \
-cp ./config.json \
-c example \
./assets
It takes some time and you will be able to see how each asset is processed.
After executing this command, a file is generated in ./cache/devnet-example.json (because our Candy Machine’s name is “example”) that contains the deployment details of each asset. That file looks something like this:
{
    "program": {
        "uuid": "DuLbRY",
        "candyMachine": "DuLbRYS9r6BpwriExXXMHY76zVTErMwxMZvzKNHmpBj5"
    },
    "items": {
        "0": {
            "link": "https://arweave.net/L9wNGmzWeYGENWVaUbfZyli-6WayLBN\_eMqbbkqKr-8",
            "name": "OMG #1",
            "onChain": true,
            "verifyRun": true
    },...
Using the verify_upload command we can verify if the metadata URI on chain has been successfully uploaded, checking that each entry in the cache file matches the URI stored on-chain. If any of the inputs do not match the on-chain information, we will get an error and will need to re-run the upload command until running the verify_upload command stops getting an error.
ts-node ./metaplex/js/packages/cli/src/candy-machine-v2-cli.ts verify\_upload \
-e devnet \
-k ./.config/solana/devnet.json \
-c example
Minting some tokens
Once the deployment is complete, we can mint a token.
ts-node ./metaplex/js/packages/cli/src/candy-machine-v2-cli.ts mint\_one\_token \
-e devnet \
-k ./.config/solana/devnet.json \
-c example
And verify them through the Solana CLI.
spl-token accounts
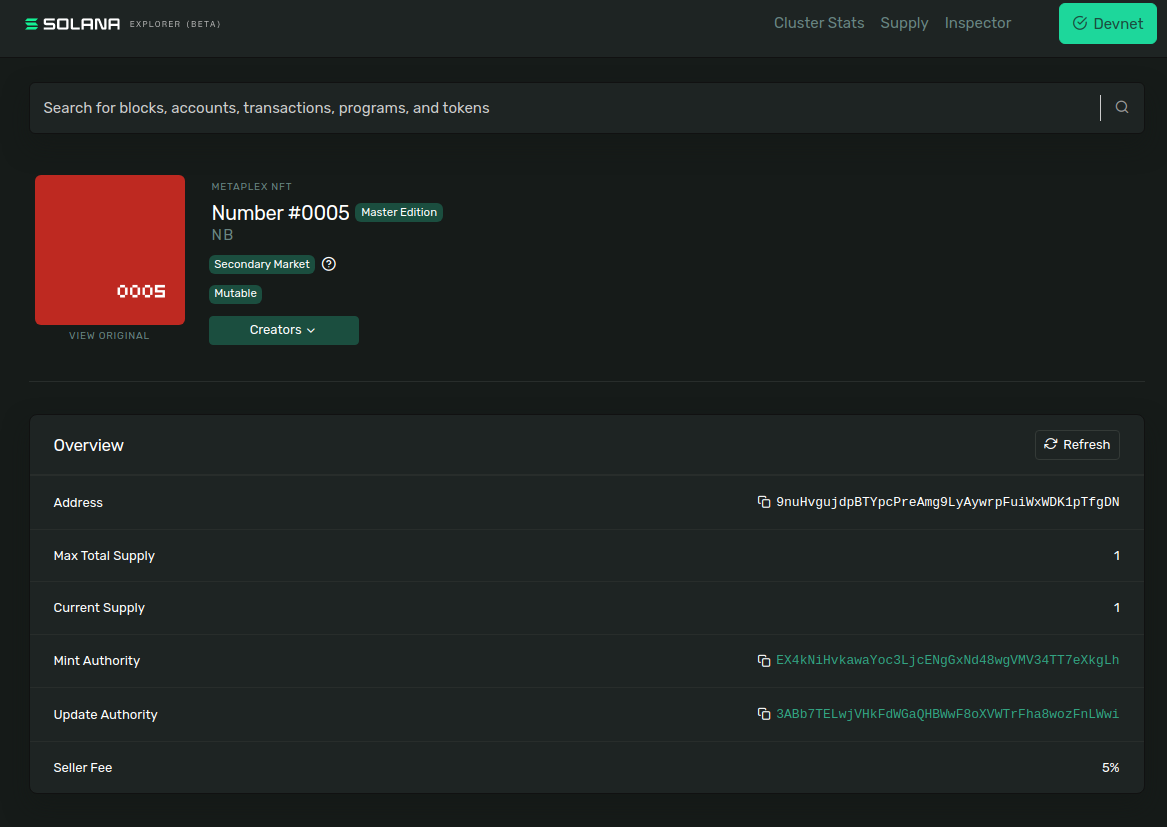
Minted token in my case.
$ spl-token accounts
Token                                         Balance
---------------------------------------------------------------
9nuHvgujdpBTYpcPreAmg9LyAywrpFuiWxWDK1pTfgDN  1

We can also mint multiple (random) tokens using the CLI.

ts-node ./metaplex/js/packages/cli/src/candy-machine-v2-cli.ts mint\_multiple\_tokens \
-e devnet \
-k ./.config/solana/devnet.json \
-c example \
--number 2spl-token accounts
Minted tokens in my case.
$ spl-token accounts
Token                                         Balance
---------------------------------------------------------------
57BVjHNE1QBJzzBWCo6VPtoBGWj491dHcz4N9f2CE8cJ  1
9nuHvgujdpBTYpcPreAmg9LyAywrpFuiWxWDK1pTfgDN  1
AohGnNVHBTYPQmtDHye1GeCsXmn7yt84ax8MGgNGvZtJ  1
We can also list all the mint addresses.
ts-node ./metaplex/js/packages/cli/src/candy-machine-v2-cli.ts get\_all\_mint\_addresses \
-e devnet \
-k ./.config/solana/devnet.json \
-cp ./config.json \
-c example
And display the Candy Machine information.
ts-node ./metaplex/js/packages/cli/src/candy-machine-v2-cli.ts show \
-e devnet \
-k ./.config/solana/devnet.json \
-cp ./config.json \
-c example
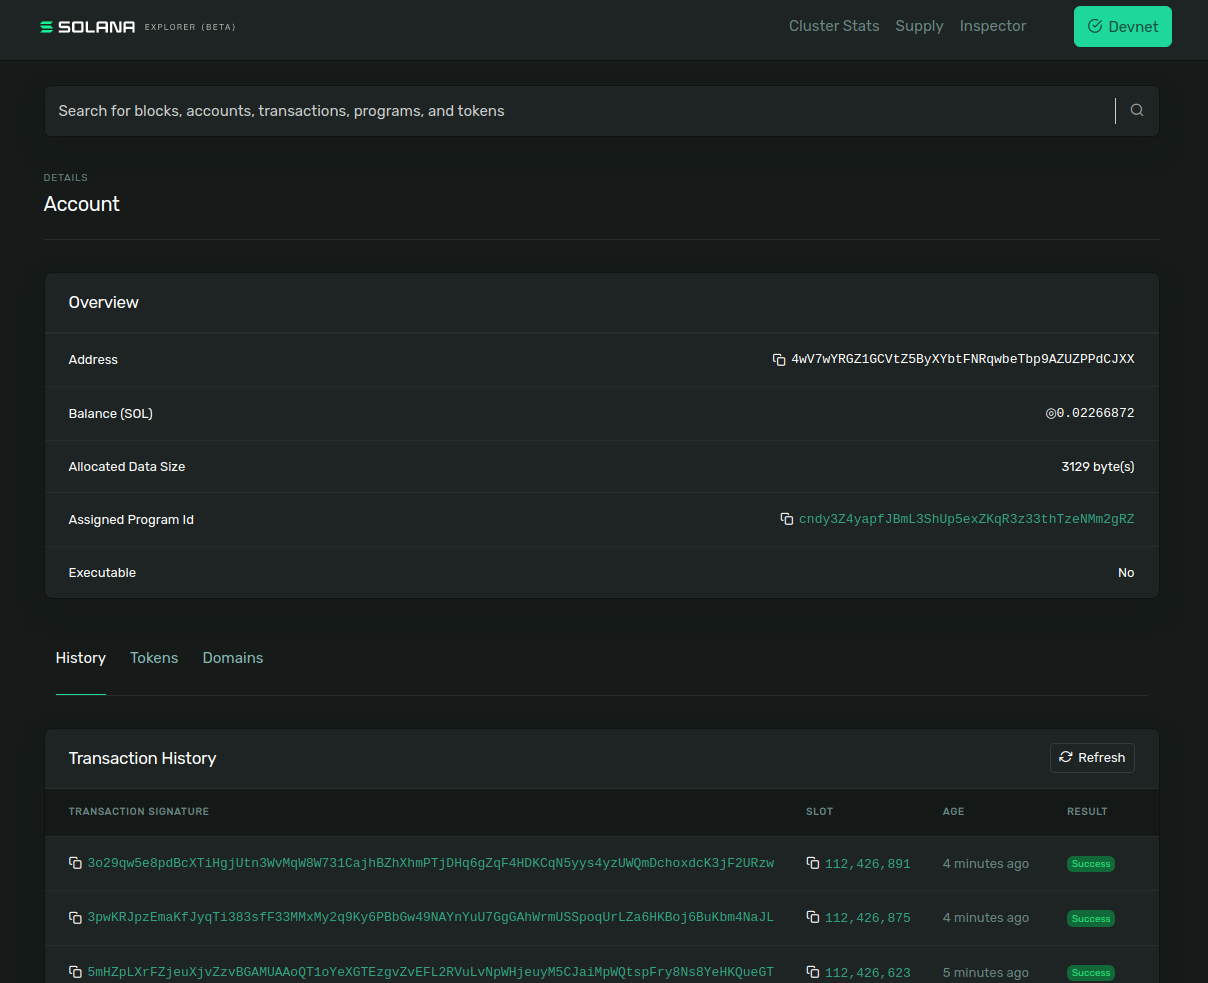
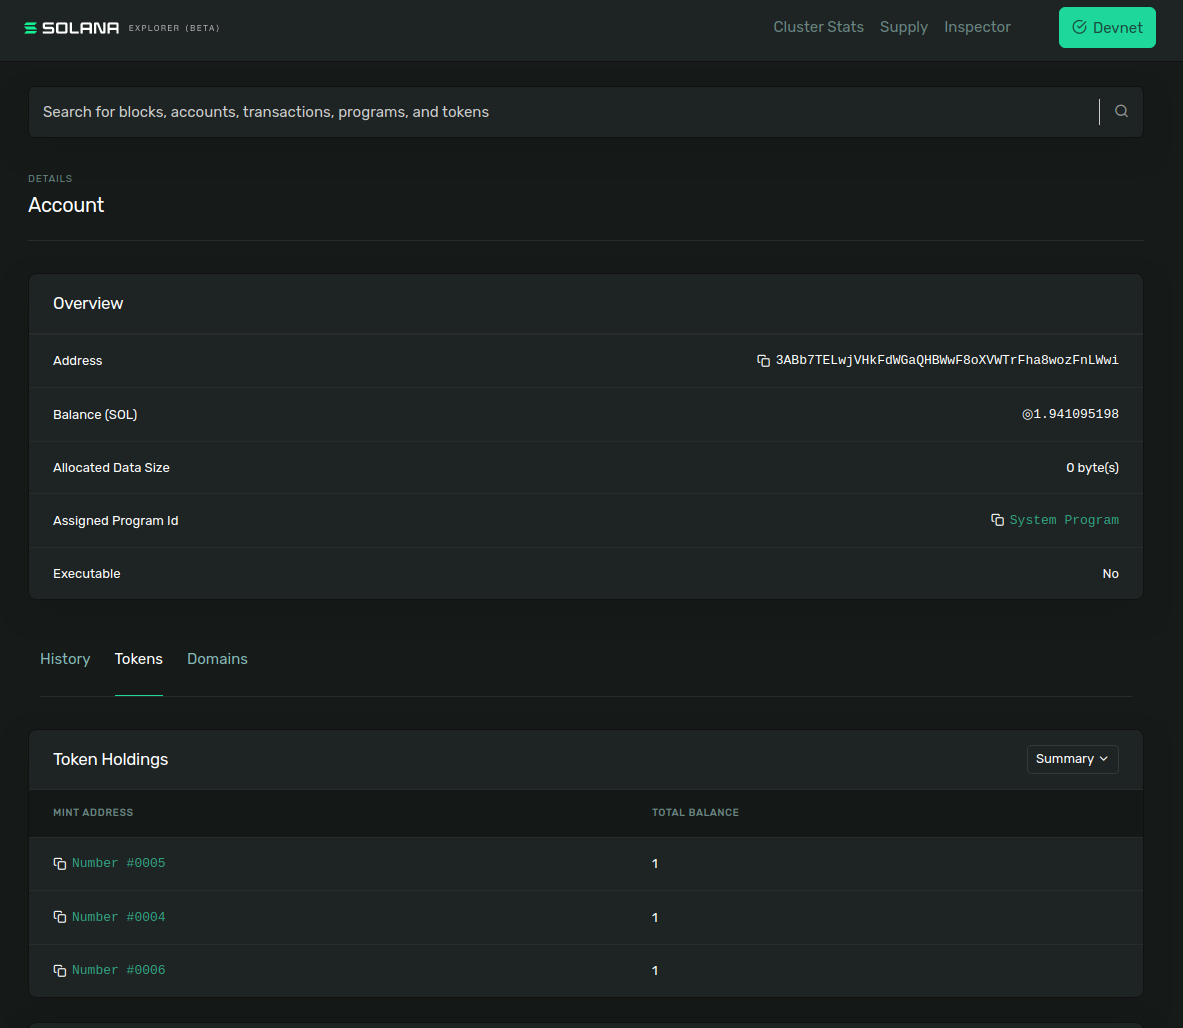
Exploring the Candy Machine and minted NFTs
Finally we can explore our Candy Machine and the minted tokens using the Solana explorer.
echo "explore the candy machine:"
CM\_ADDRESS=$(ts-node ./metaplex/js/packages/cli/src/candy-machine-v2-
cli.ts show -e devnet -k ./.config/solana/devnet.json -cp
./config.json -c example | grep Key | cut -d' ' -f 2)
echo [https://explorer.solana.com/address/$CM\_ADDRESS?cluster=devnet]
echo "explore the minted tokens:"
echo [https://explorer.solana.com/address/$(solana address)/tokens?
cluster=devnet]
Follow the links generated for the previous snippet and you will see the deployed Candy Machine and the minted tokens.
Frequently asked questions
What is the Candy Machine in a Metaplex NFT deployment?
The Candy Machine is a fully on-chain generative NFT distribution program from Metaplex. You configure it through a config.json file that sets parameters like price, number of NFTs, treasury account, and storage method, then generate the on-chain program using the Metaplex CLI. It handles minting NFTs directly on the Solana blockchain.
Where are NFT assets stored when deploying with Metaplex?
In this guide the storage method is set to Arweave, a protocol that stores data on a decentralized network for a single upfront fee. The config.json starts with arweave-sol and is changed to arweave. Metaplex's asset store list also includes other options such as AWS.
Can the same deployment process be used on Solana mainnet, not just devnet?
Yes. The guide deploys to devnet, but the same procedure is valid for testnet and mainnet. Devnet is convenient because you can fund the wallet using the solana airdrop command to obtain SOL needed to cover deployment costs before targeting a production network.